Today I will share a little bit knowledge about how to create windows 7 live cd. Before we can continue to the process on how to create this live cd, let me tell you what does live cd for? From my experience live cd can be our savior when something goes wrong with our PC. The other about live cd is that, you can use this cd to check whether your computer run normally or there is something wrong with your computer. Here some tools you need to prepare before we can create a live cd.
Tools/software
- AOMEI PE Builder
- Drivers (as you need it)
- Free software such smart partition or others free software that you need.
- Blank Cd/thumb drive
Process:
 1. Install AOMEI PE Builder on your PC or laptop.
2. Open AOMEI PE Builder
3. Click next
4. Click next again
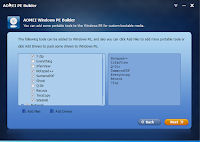
 5. Here you can see some menu that will be included on your live cd, you can customized this menu by thick on the tools you need or don't need. You can also add some some drives that maybe useful for you such wireless driver or bluetooth driver. The best thing I like from this software is that we can add certain portable program that can support our job in repairing pc or laptop. Something to remember that is when you add more files it means you needs a bigger thumb drive more than 4 gb, so better for you to prepare important tools only.
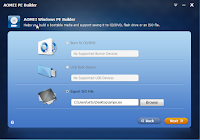
6. Click next and choose which media you like to use for your live cd. (see picture)
7. Click next and it will start the process in creating live cd.
8. Wait till the process finish and you will have live Windows 7 cd with you.
Good luck.
Tools/software
- AOMEI PE Builder
- Drivers (as you need it)
- Free software such smart partition or others free software that you need.
- Blank Cd/thumb drive
Process:
 1. Install AOMEI PE Builder on your PC or laptop.
2. Open AOMEI PE Builder
3. Click next
4. Click next again
 5. Here you can see some menu that will be included on your live cd, you can customized this menu by thick on the tools you need or don't need. You can also add some some drives that maybe useful for you such wireless driver or bluetooth driver. The best thing I like from this software is that we can add certain portable program that can support our job in repairing pc or laptop. Something to remember that is when you add more files it means you needs a bigger thumb drive more than 4 gb, so better for you to prepare important tools only.
6. Click next and choose which media you like to use for your live cd. (see picture)
7. Click next and it will start the process in creating live cd.
8. Wait till the process finish and you will have live Windows 7 cd with you.
Good luck.
EmoticonEmoticon