Some friends of mine asked me that they had problem regarding their printer. When they turn their printer on they could not see that their printer can work properly. They said my printer won't yield any sound. It blinked many times, well this is common problem regarding printer usage. When you see dialogue box that appear on your screen it stated that your printer waste ink pad is full or when you see green light lit on alternately with the amber light. So how to resolve this problem? Today I will try to guide to resolve this problem using the simplest way. Before you can resolve this problem there are something you need to prepare:
- You have to replace the ink pad.
- Download Wic reset tools
- For Windows
- For Mac OS
- For Linux
1. First step
For first step surely you can use Wic utility to resolve your printer overload problem. To do this you just need to download this utility software and install it in your computer. Then you can open it, when you open this software, it will download some file that will be used to recognize your printer. When it has finished install some add on it will detect your active printer which is located on upper left side of this software. Now select your active printer and then choose menu Reset Waste Ink Counters on upper right side menu then this utility will ask a serial numbers which you need to put inside dialogue box to continue using this software. When you don't have serial number you can put "trial" on the dialogue box to continue the process, but remember when you use trial your printer will reset to 90% state which is mean it will overload again around couple of printing process. If you want to make ti permanently you can buy serial number for only one printer for about $9,99 for one time only and you can pay it by Paypal or Credit Card. After you hit Ok button in dialogue box it will ask you to turn off your printer and then turn it on again and your printer will be ready to do its job again.
For complete video tutorial you can see here
2. Second step
This step almost the same method like number one, but you can use different software or tool to resolve this problem. When you don't have the utility you can download it for free using this link here.
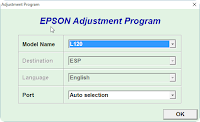
 Extract this software on your desktop or any place you fill comfortable. Open this software and don't forger to turn your printer on. Select L120 on model name and choose auto selection on its port. After pressing Ok you will see the first image like on the left side and click particular adjustment mode then this utility will give you some menu selection, now you can select waste ink pad Counter menu and then it will bring you a dialogue that you need to put check mark. Check Main pad counter and platen pad counter and then hit Initialization button. After a few moment you will be asked to turn off your printer and you can close this software. Now you can turn your printer on again and you are ready to go.
3. Third Step
This last step is consider for advance user only, never try this method if you don't have any electronic skills. When the above mention doesn't work for your printer then this step is the most suitable trick for you. Disassemble your printer board from it housing and try to find below image which is called E-prom chip. After you can locate this e-prom chip try to take it off by using hot air blower or suitable solder. Replace this E-prom chip with the new one which you can buy it on E-store for about $3 to $5 each. When you have succeeded replace this E-prom chip your printer will back to work again. If you have something to ask please write on comment below.


EmoticonEmoticon